


DIY Installation Guide: Installing Your Dawninghome Awning in Under an Hour
Introduction
Thinking about upgrading your porch or entryway with a polycarbonate awning? At Dawninghome, we’ve made it easy for you to install one of our modular polycarbonate awnings by yourself—no contractor required. In fact, most homeowners can complete the entire installation in under an hour!
This step-by-step guide will walk you through the process, from measuring the space to securing the awning in place. Get ready to enhance your home’s curb appeal and enjoy all-season protection with just a few basic tools.
Tools & Materials You’ll Need
Before you start, gather these simple tools and materials:
-
Power drill (with screwdriver attachment)
-
Level (to ensure straight installation)
-
Measuring tape
-
Wrench or socket set
-
Screws and wall anchors (provided in the kit)
-
Dawninghome Polycarbonate Awning Kit (with pre-drilled holes and all necessary mounting hardware)
Tip: If you’re installing your awning on a brick wall or a concrete surface, you may need a masonry drill bit to create holes for the anchors.

Step 1: Measure and Mark the Space
Before you begin the installation, it’s important to measure the space where you want the awning to go. Here’s how:
-
Measure the width of your door or window to ensure the awning fits.
-
Determine the height: The bottom edge of the awning should be about 7–8 feet above the ground, depending on your entryway’s clearance.
-
Use a pencil to lightly mark where the brackets will go on the wall.
Pro Tip: Make sure the awning will extend at least 6 inches beyond the width of your door or window for maximum protection.

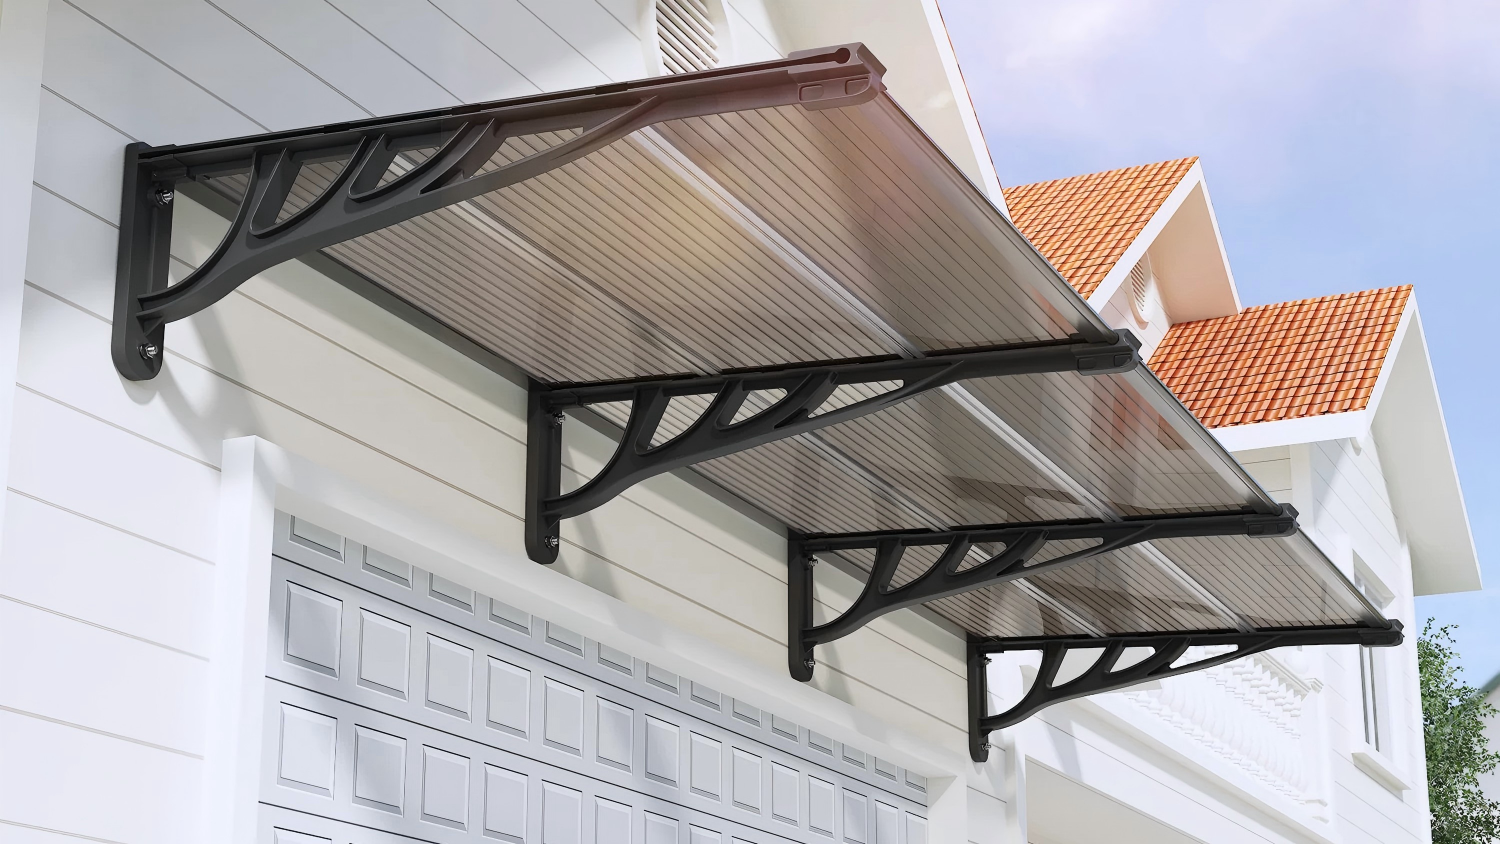
Step 2: Install the Brackets
Now that you’ve marked the spots for your brackets, it’s time to install them.
-
Position the first bracket at the desired height, aligning it with the markings on the wall.
-
Drill pilot holes through the bracket holes into the wall. If you're installing on brick or concrete, use a masonry drill bit and wall anchors for extra support.
-
Screw in the bracket with a wrench or socket set until it’s firmly secured to the wall.
-
Repeat for the second bracket, making sure both are level and evenly spaced.
Tip: Check that both brackets are aligned horizontally using your level before tightening the screws.

Step 3: Attach the Polycarbonate Awning Panel
Once the brackets are installed, it’s time to attach the polycarbonate panel:
-
Lift the polycarbonate panel (with the help of a second person, if necessary) and align it with the brackets.
-
Slide the panel into the mounting grooves on the brackets. The panel should rest securely on the bracket arms.
-
Screw the panel into place using the provided screws and screwdriver.
Pro Tip: Polycarbonate panels are lightweight but sturdy—handle carefully to avoid scratches during installation.

Step 4: Final Checks
Once the awning is securely in place, it’s time for a final check:
-
Double-check that the awning is level and properly aligned.
-
Ensure that all screws are tightened securely, and the panel is held firmly in place.
-
Step back and admire your work! You’ve just installed a beautiful, protective awning that will keep your entryway shaded, dry, and stylish

Step 5: Enjoy Your New Awning!
Now that you’ve completed the installation, it’s time to enjoy your new outdoor space. Whether you're protecting your front porch, patio, or garage, this DIY awning provides year-round protection from the sun, rain, and snow.
Final Thoughts
Installing your Dawninghome Polycarbonate Awning is a quick and easy project that can instantly improve your home's exterior. With the right tools and a little bit of time, you can protect your entryway, keep it cool during the summer, and add a sleek, modern touch to your porch.
If you're ready to take your outdoor space to the next level, follow this simple guide and enjoy the benefits of your new awning today.


Deixe um comentário
Todos os comentários são moderados antes de serem publicados.